By: Team T09-2 Since: Aug 2018 Licence: MIT
- 1. Setting up
- 2. Design
- 3. Implementation
- 3.1. Card-level operations
- 3.2. Handle invalid commands
- 3.3. Deck Review Implementation
- 3.4. Performance Tracking Implementation
- 3.5. UI Implementation
- 3.6. Keep cards panel updated by UI
- 3.7. Import/Export Implementation
- 3.8. Logging
- 3.9. Autocomplete Implementation
- 3.10. Card Scheduling implementation
- 3.11. Configuration
- 4. Documentation
- 5. Testing
- 6. Dev Ops
- Appendix A: Product Scope
- Appendix B: User Stories
- Appendix C: Use Cases
- Appendix D: Instructions for Manual Testing
- Appendix E: Non Functional Requirements
- Appendix F: Glossary
1. Setting up
1.1. Prerequisites
-
JDK
9or laterJDK 10on Windows will fail to run tests in headless mode due to a JavaFX bug. Windows developers are highly recommended to use JDK9. -
IntelliJ IDE
IntelliJ by default has Gradle and JavaFx plugins installed.
Do not disable them. If you have disabled them, go toFile>Settings>Pluginsto re-enable them.
1.2. Setting up the project in your computer
-
Fork this repo, and clone the fork to your computer
-
Open IntelliJ (if you are not in the welcome screen, click
File>Close Projectto close the existing project dialog first) -
Set up the correct JDK version for Gradle
-
Click
Configure>Project Defaults>Project Structure -
Click
New…and find the directory of the JDK
-
-
Click
Import Project -
Locate the
build.gradlefile and select it. ClickOK -
Click
Open as Project -
Click
OKto accept the default settings -
Open a console and run the command
gradlew processResources(Mac/Linux:./gradlew processResources). It should finish with theBUILD SUCCESSFULmessage.
This will generate all resources required by the application and tests.
1.3. Verifying the setup
-
Run the
seedu.address.MainAppand try a few commands -
Run the tests to ensure they all pass.
1.4. Configurations to do before writing code
1.4.1. Configuring the coding style
This project follows oss-generic coding standards. IntelliJ’s default style is mostly compliant with ours but it uses a different import order from ours. To rectify,
-
Go to
File>Settings…(Windows/Linux), orIntelliJ IDEA>Preferences…(macOS) -
Select
Editor>Code Style>Java -
Click on the
Importstab to set the order-
For
Class count to use import with '*'andNames count to use static import with '*': Set to999to prevent IntelliJ from contracting the import statements -
For
Import Layout: The order isimport static all other imports,import java.*,import javax.*,import org.*,import com.*,import all other imports. Add a<blank line>between eachimport
-
Optionally, you can follow the UsingCheckstyle.adoc document to configure Intellij to check style-compliance as you write code.
2. Design
2.1. Architecture
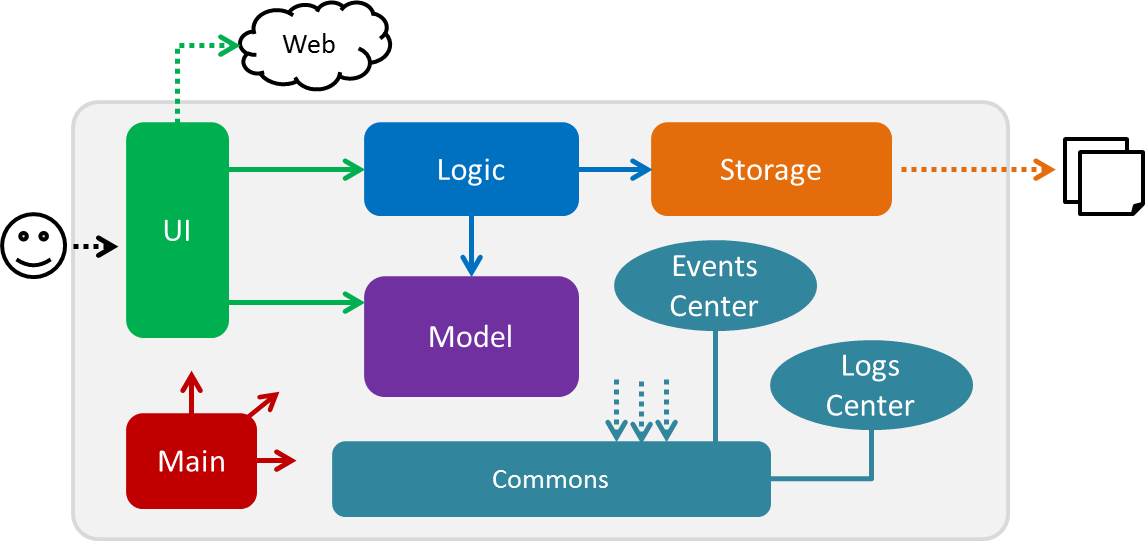
The Architecture Diagram given above explains the high-level design of the App. Given below is a quick overview of each component.
Main has only one class called MainApp. It is responsible for,
-
At app launch: Initializes the components in the correct sequence, and connects them up with each other.
-
At shut down: Shuts down the components and invokes cleanup method where necessary.
Commons represents a collection of classes used by multiple other components. Two of those classes play important roles at the architecture level.
-
EventsCenter: This class (written using Google’s Event Bus library) is used by components to communicate with other components using events (i.e. a form of Event Driven design) -
LogsCenter: Used by many classes to write log messages to the App’s log file.
The rest of the App consists of four components.
Each of the four components
-
Defines its API in an
interfacewith the same name as the Component. -
Exposes its functionality using a
{Component Name}Managerclass.
The sections below give more details of each component.
2.2. UI component
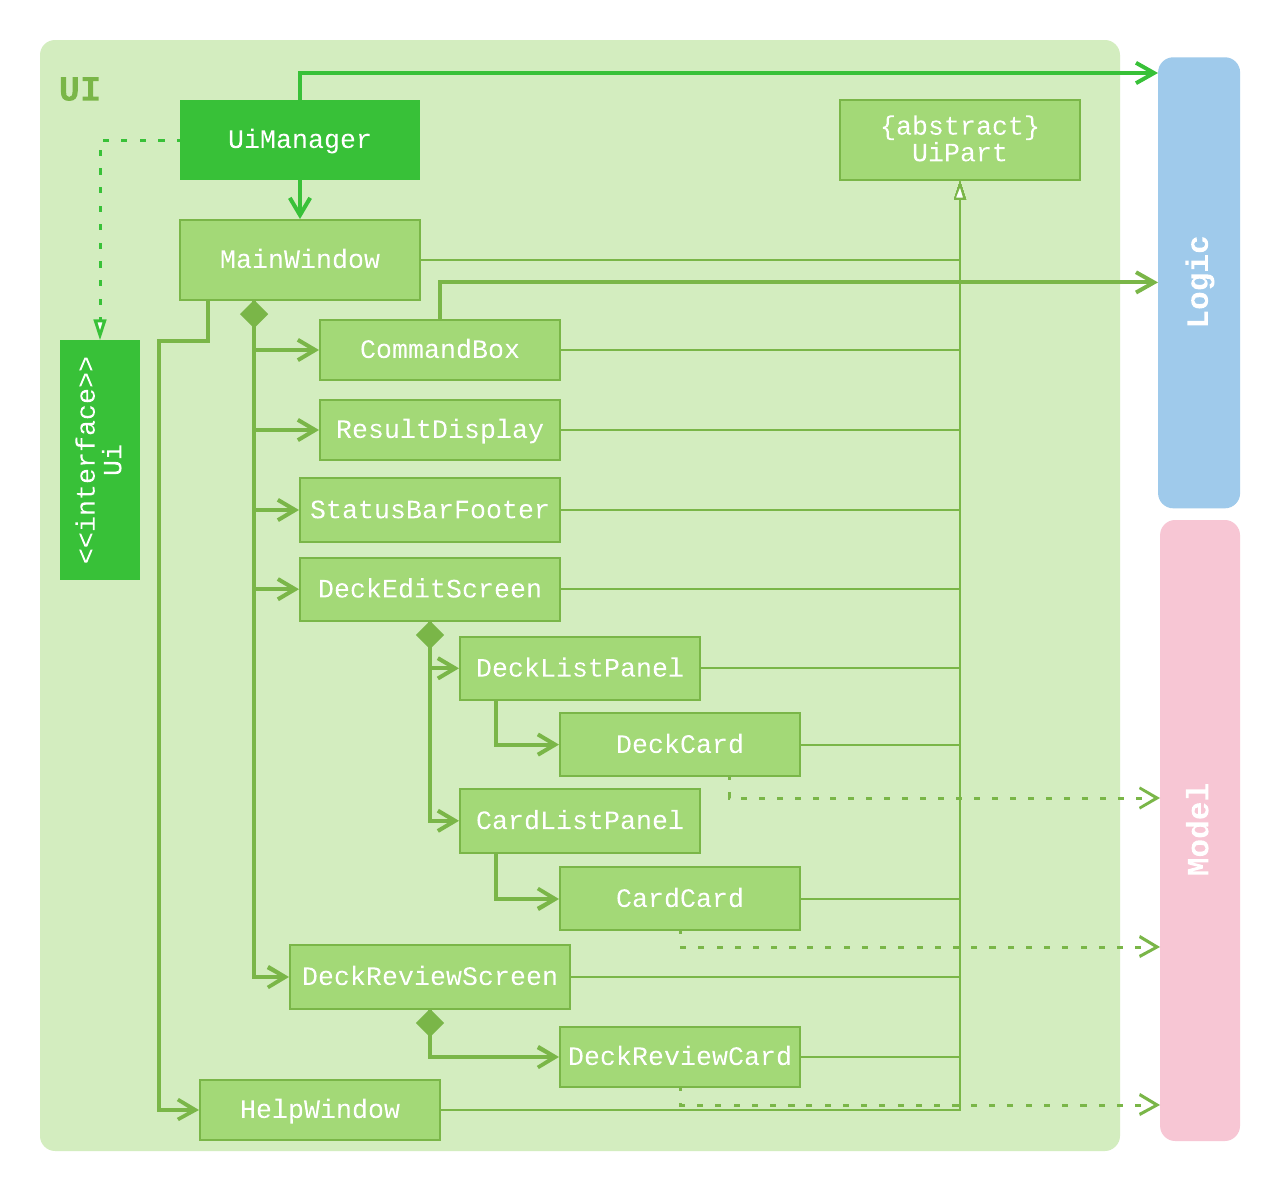
API : Ui.java
The UI consists of a MainWindow that is made up of parts e.g.CommandBox, ResultDisplay, DeckEditScreen,
DeckReviewScreen, StatusBarFooter etc. The DeckEditScreen is in turn made up of DeckListPanel and
CardListPanel and the DeckReviewScreen is made up of DeckReviewCard. All these, including the MainWindow,
inherit from the abstract UiPart class.
The UI component uses JavaFx UI framework. The layout of these UI parts are defined in matching .fxml files that are in the src/main/resources/view folder. For example, the layout of the MainWindow is specified in MainWindow.fxml
The UI component
-
Executes user commands using the
Logiccomponent. -
Binds itself to some data in the
Modelso that the UI can auto-update when data in theModelchanges. -
Responds to events raised from various parts of the App and updates the UI accordingly.
2.3. Logic component
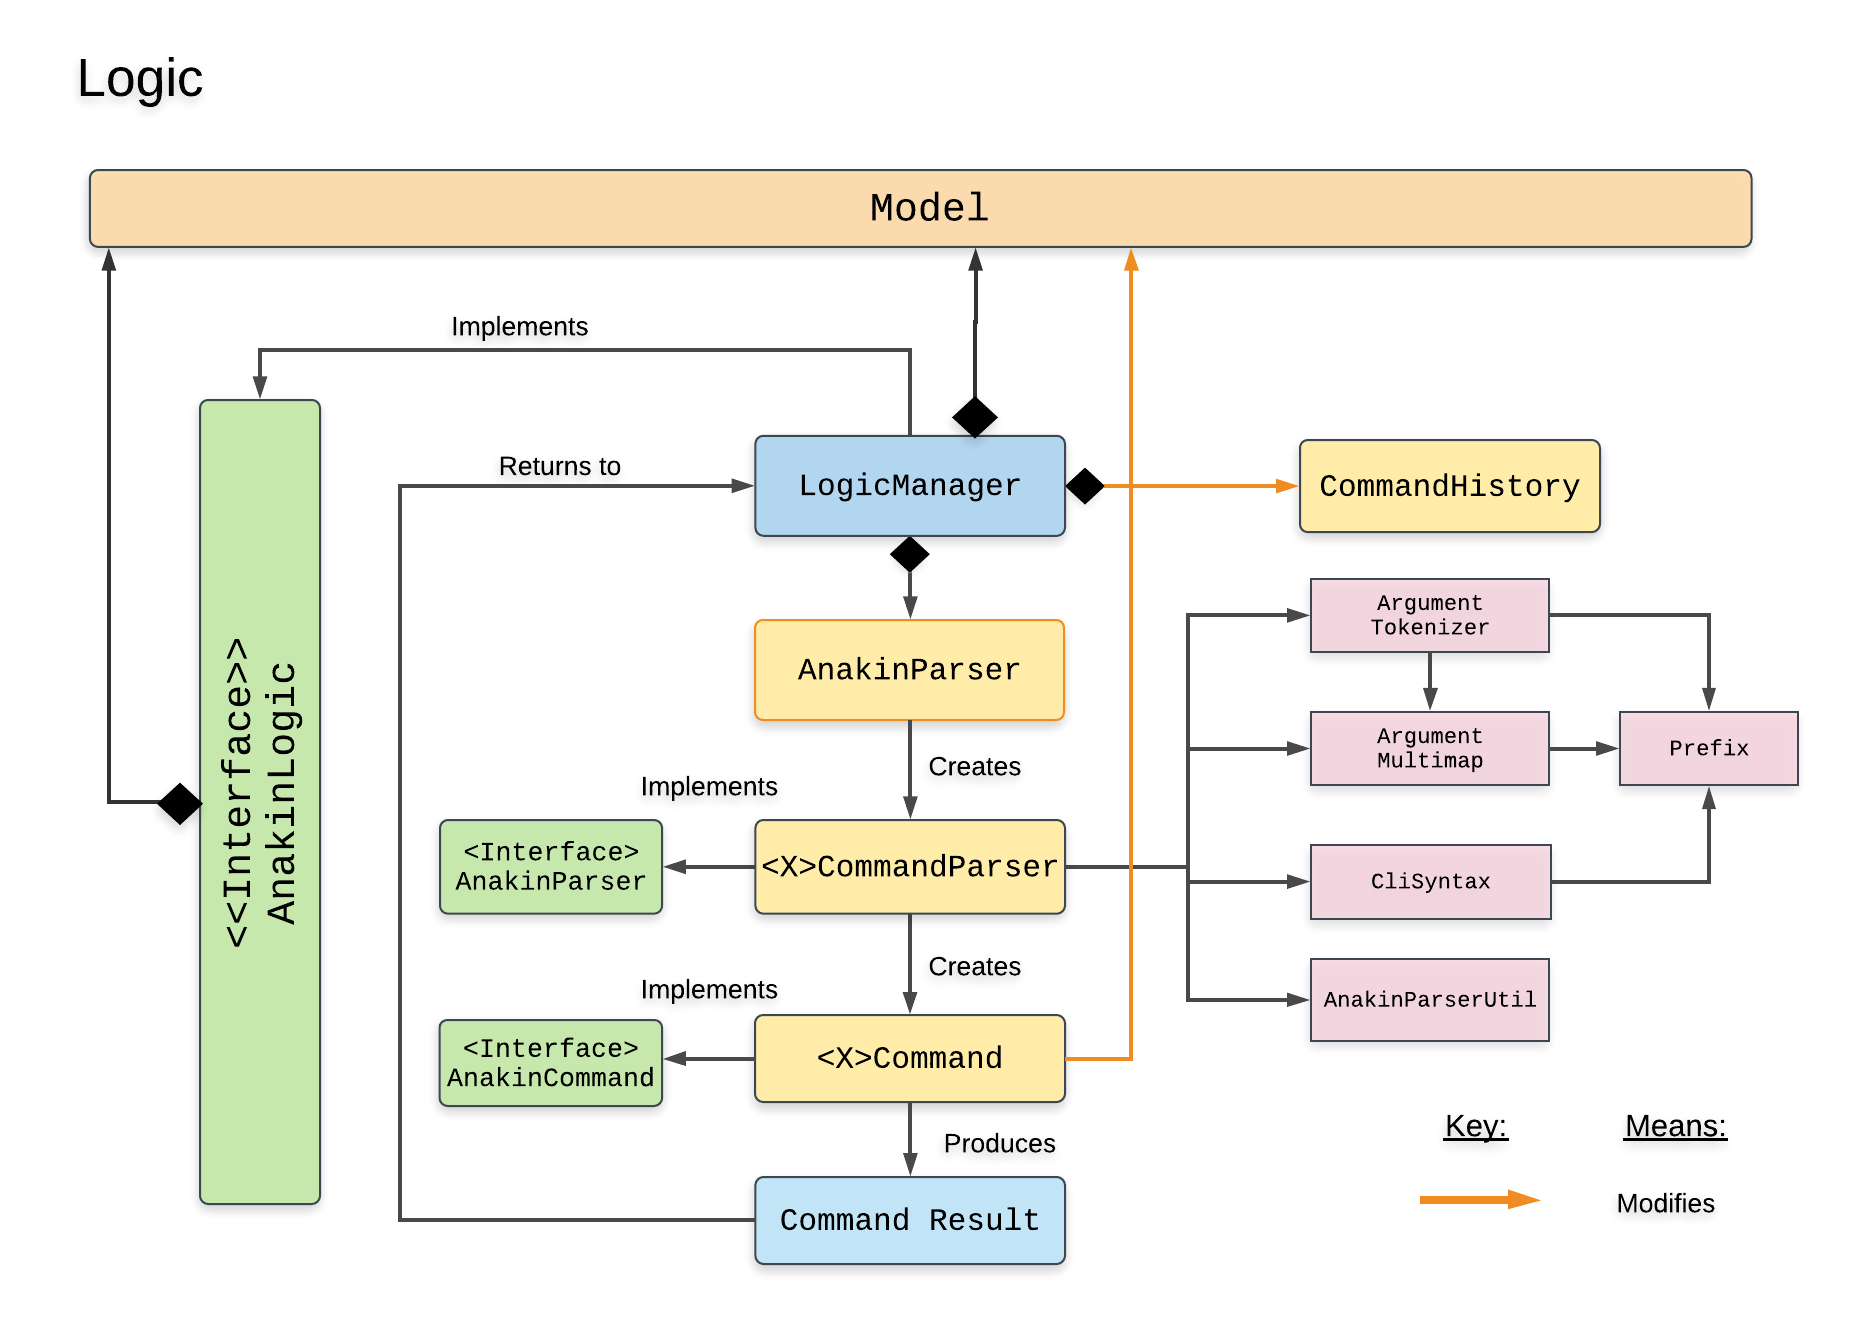
Structure of the Logic component
The 'Logic' component:
The LogicManager contains an AnakinModel, an AnakinParser, and a CommandHistory.
When a string input by the user is parsed by AnakinParser, it creates a new AnakinCommand of the appropriate type with the relevant arguments (based on parser tokens). Each AnakinCommand has its own Class. LogicManager will call execute on the command object. If successful, LogicManager will modify Model accordingly. Regardless of success, LogicManager will update CommandHistory with the CommandResult.
2.5. Storage component
This section details the Storage component, which is the bridge between internal application state and external files.
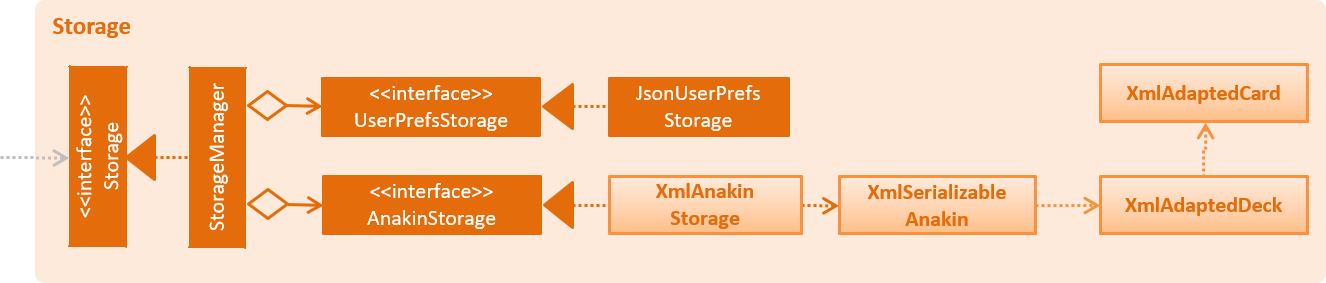
API : Storage.java
The Storage component,
-
can store
UserPrefobjects in json format and read it back -
can save Anakin’s data in XML format and read it back
3. Implementation
This section describes some noteworthy details on how certain features are implemented.
3.1. Card-level operations
3.1.1. Current implementation
Card-level operations are supported in Anakin class:
-
Anakin#addCard(Card card) - Add a card to the current deck.
-
Anakin#deleteCard(Card card) - Delete a card from the current deck.
-
Anakin#updateCard( Card target, Card editedCard) - Update the information of a card inside the current deck.
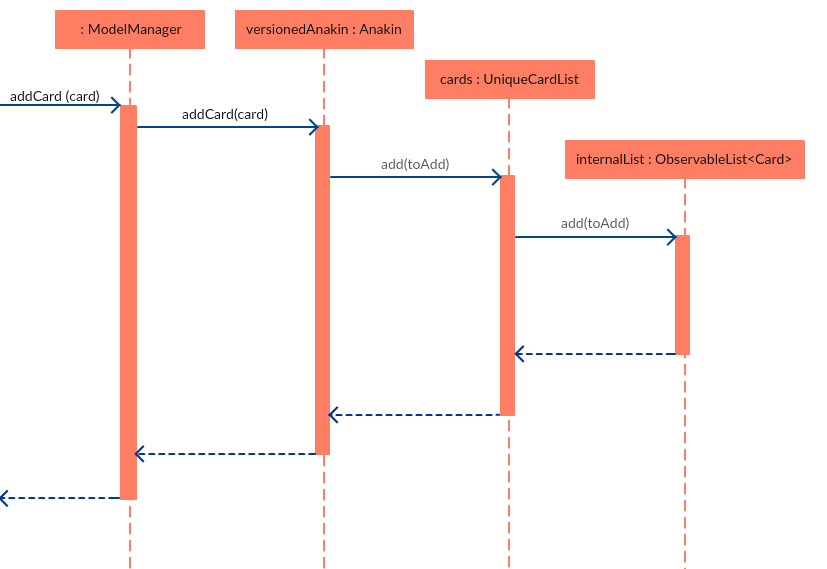
These operations are exposed in the Model interface as: Model#addCard(Card card), Model#deleteCard(Card card), Model#updateCard(Card target, Card editedCard) respectively.
Given below is an example usage scenario and how these operations are executed in Model.
The user executes newcard q/Hello? a/World to add a new card with question "Hello?" and answer "World" to the current deck.
The following sequence diagram shows how the newcard operation works:
3.1.2. Design consideration
-
Alternative 1 (current choice): Implement the logic of card-level operations in Anakin class.
-
Pros: Easy to implement and debug as all logic related with executing commands are implemented in Anakin.
-
Cons: Deck class is not informed, or notified when its UniqueCardList is modified. This might result in unexpected behaviors if a card-level command is executed and the person in charge of Deck class assumes that the UniqueCardList is unmodified.
-
-
Alternative 2: Implement the logic of card-level operations in Deck class.
-
Pros: The responsibility of each class is clear, only a Deck can modify its list of cards.
-
Cons: The logic for executing deck-level and card-level commands are implemented at different places. We must ensure that the implementation of each command is correct.
-
3.2. Handle invalid commands
3.2.1. Current implementation
-
Deck-level operations (
newdeck,editdeck,deldeck,exportdeck,importdeck) are disabled when user is inside a deck. -
These commands will be blocked in Logic component by checking the state of the application through Model interface.
3.2.2. Design consideration
-
Alternative 1 (current choice): Implement the logic of command-checking in Logic component
-
Pros:
-
Reduce possible bugs caused by having each methods check the state of the application before execution.
-
Model component does not have to handle invalid commands.
-
Exceptions are thrown and handled inside Logic components instead of being passed from Model to Logic.
-
-
Cons: Increase coupling between Logic and Model component.
-
-
Alternative 2: Handle all commands logic in Model component
-
Pros: Lower degree of dependency between Logic and Model (aka low coupling), thus make the process of maintenance, integration and testing easier.
-
Cons: Model component has to check for invalid commands according to its state for all commands.
-
3.3. Deck Review Implementation
3.3.1. Current Implementation
The deck review mechanism is facilitated by Anakin from Model, the MainWindow and DeckReviewScreen from UI and
the EventsCenter.
It implements the following operations:
-
Anakin#isReviewingDeck()- Checks if user is in review mode. -
Anakin#startReview()- Starts a review. -
Anakin#endReview()- Ends a review. -
Anakin#getIndexOfCurrentCard()- Retrieves the index of the last known reviewed card. -
Anakin#setIndexOfCurrentCard()- Updates the index of the last known reviewed card.
These operations are exposed in the Model interface as Model#isReviewingDeck(), Model#startReview(),
Model#endReview(), Model#getIndexOfCurrentCard() and Model#setIndexOfCurrentCard respectively.
Also, it is supported by the following commands from Logic:
-
review- Starts the review of a selected deck -
endreview- End the review -
nextcard- Moves to the subsequent card in the deck -
prevcard- Moves to the previous card in the deck -
flipcard- Flips the current card to display either the question or the answer
Furthermore, it posts the following events to trigger changes in UI:
-
StartReviewRequestEvent(Card card) -
FlipCardRequestEvent() -
ReviewNextCardEvent(Card nextCard) -
ReviewPreviousCardEvent(Card prevCard) -
EndReviewRequestEvent()
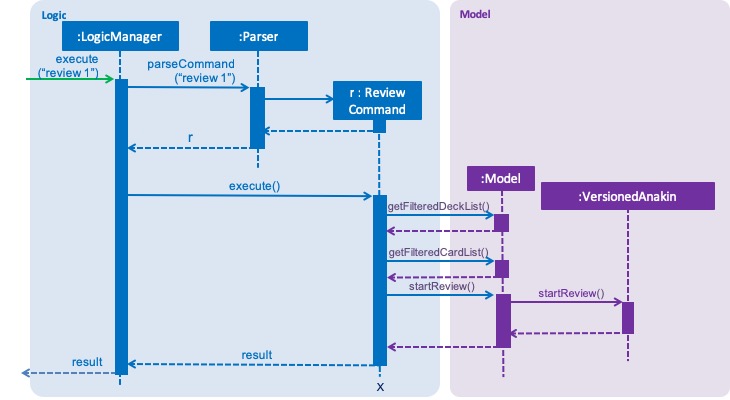
Given below is an example usage scenario and how the deck review mechanism behaves at each step.
Step 1. The user launches the application and he already has a deck of cards that he wants to review. He executes
review 1 command to review the first deck on the list.
The following sequence diagram shows how the review operation works:
Step 2. The user sees the question displayed on the first card and comes up with his own answer. To verify his
answer, he executes the flipcard command.
Step 3. The user wants to go to the next card and executes nextcard command.
Step 4. If the user wants to go back to review a previous card, he executes prevcard command. The explanation
of the process is similar to Step 3.
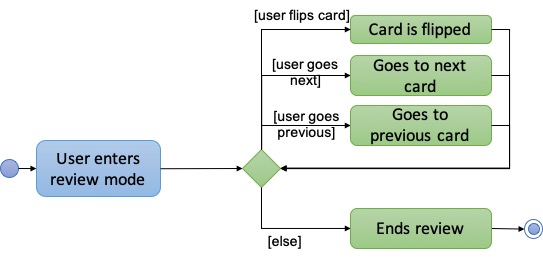
Step 5. When the user is done, he executes endreview to quit review mode.
The following activity diagram summarizes what happens when a user enters deck review mode.
3.3.2. Design Considerations
Aspect: Tracking index of current card
-
Alternative 1 (current choice): Store a
currentIndexfield inUniqueCardList-
Pros: Easy to implement and complies with separation of concerns. Can also easily saved in Storage.
-
Cons: Introducing state to
UniqueCardListmay not be the best solution.
-
-
Alternative 2: Store
currentCardIndexinAnakin-
Pros: Convenient access to field by exposing method in
Model -
Cons: Field is not required by many operations in
Anakinand its use case is specific to deck reviews.
-
Aspect: Iterating through cards during review
-
Alternative 1 (current choice): Post events for UI to change the currently reviewed card.
-
Pros: Logic of iterating cards is decoupled from UI.
-
Cons: Limited scalability as adding new functionality require adding more events and event handlers.
-
-
Alternative 2: Implement a ListElementPointer for the list of cards similar to command history.
-
Pros: Able to easily implement more functionality such as keyboard shortcuts for iterating cards.
-
Cons: Still requires events to trigger changes in UI.
-
3.4. Performance Tracking Implementation
This section details the implementation details and considerations of the performance tracking feature.
3.4.1. Current Implementation
Cards contain the Performance parameter, implemented as an enum, as well as a timesReviewed counter. The fields
are set to normal difficulty and 0 counts respectively on initialization. Since these are metadata fields, they
will be considered optional and a Card can still be created without specifying them, which will result in the
fields being reset to the default initializations.
The user can change the difficulty of a card during "review" mode. Users can only do this on the card they are
currently reviewing, as it is the only time it makes sense to do so. Cards assigned a difficulty will have their
timesReviewed counter incremented by one.
The command available to the user will be classify DIFFICULTY, where DIFFICULTY is any of the strings
easy, normal, hard, corresponding to the level of perceived difficulty for that
flashcard.
Given below is an example usage scenario for the performance tracking feature.
Step 1. The user requests to "review" a deck. He sees the question of card A from the deck.
Step 2. The user requests to see the answer. He sees the displayed answer.
Step 3. The user executes classify hard. Card A is now assigned the difficulty of hard.
Step 4. The user continues reviewing the rest of the cards in the deck.
Step 5. Card A is shown to the user more regularly when he reviews the same deck in the future.
3.5. UI Implementation
3.5.1. Previous implementation (v1.2)
The UI for Anakin at v1.2 split the main area into three sections:
-
(Left) List of decks
-
(Right) List of cards in selected deck
This was implemented by morphing PersonListPanel and PersonListCard into our use cases for decks and cards and
editing MainWindow to render changes in both decks and cards.
Given below is an example usage scenario and how the lists are displayed at each step.
Step 1. The user launches Anakin application and sees a list of sample decks. At this step, the CardListPanel is empty.
Step 2. The user executes cd 1 command to navigate into the first deck. Anakin renders the deck’s cards (at index
1) on the CardListPanel.
Step 3. The user executes cd 2 command to navigate into the second deck. Anakin switches the displayed cards with
that of the second deck.
Step 4. The user executes cd .. command to navigate out of the second deck. The CardListPanel is empty again.
3.5.2. Current implementation (v1.3)
The UI for Anakin was revamped in v1.3. Previously in v1.2, the application had a list of decks and list of cards on
its main view MainWindow. In v1.3, the panels displaying these lists have been refactored into DeckEditScreen.
This is because of the addition of DeckReviewScreen which acts as the user interface when users are reviewing a
deck. When the user starts reviewing a deck, MainWindow will swap DeckEditScreen with DeckReviewScreen to show
the correct UI. The DeckReviewScreen displays a DeckReviewCard at a time, as the user is going through his
flashcards. It also boasts of the ability to flip the card to display questions and answers separately, and iterate
to subsequent and previous cards in the deck. See Deck Review Implementation for an example use case.
3.5.3. Design considerations
-
Alternative 1 (current choice): Display deck and card lists side by side
-
Pros: Easy to implement
-
Cons: Somewhat lacking in aesthetics
-
-
Alternative 2: Display deck and card list in the same panel and switch out accordingly
-
Pros: Looks more impressive in UI-wise
-
Cons: Have to implement a switch event to toggle items inside StackPane
-
3.6. Keep cards panel updated by UI
3.6.1. Problem with the old design
The UI (MainWindow) constructs the displayed cards panel by obtaining an ObservableList of cards from Model,
this list is assigned when UI starts, and will never be re-assigned.
The UI "observes" the list and updates when it is modified.
This approach works well for the deck list because Anakin contains only 1 list of decks. However, the card list can not be updated in the same manner because Model component will change its card list’s reference when user enters another deck.
In this case, the card list in UI will not be updated because the card list of which UI has reference to is actually not changed, but it is the wrong card list.
3.6.2. Design considerations
-
Alternative 1 (current choice): Have a
displayedCardslist in Model and keep it updated with the current list of cards-
Explanation: The UI needs only 1 reference to this
displayedCardslist, each time user enters another deck,displayedCardslist is cleared and the new deck’s list of cards is copy to thedisplayedCardslist -
Pros: The structure of Model and UI component needs not be changed
-
Cons: Need to keep a copy of the current card list, copying the whole list of cards for each
cdoperation might affect performance
-
-
Alternative 2: Model component raises an event when its current card list’s reference is changed
-
Explanation: When user
cd(enters) a new deck, Model will raise an event (CardListChangedEvent), which is subscribed by UI, then UI can re-assign its list of cards and update the cards panel accordingly -
Pros: Better performance
-
Cons: Need to re-design Model and UI components
-
3.7. Import/Export Implementation
3.7.1. Current implementation (v1.3)
Imports and exports in Anakin are managed by a PortManager.
Exporting a Deck will create an XmlExportableDeck, which is exported as a .xml file in the same folder as the Anakin.jar file.
Upon creation, Model will initialize a PortManager. When an ExportCommand or ImportCommand is executed, it will call the Model’s importDeck or exportDeck method.
PortManager uses the java.nio Path package to navigate directories.
3.7.2. Design considerations
-
Alternative 1 (current choice): Have Model contain a PortManager class to manage imports and export.
-
Explanation: Commands pass their arguments to Model, which passes arguments to the PortManager. In the case of ExportCommand, the
Deckto be exported is passed from Command to Model to PortManager. PortManager returns aStringof the export location, which is passed to Model, then passed to the Command for printing. -
Pros: Better modularity and Separation of Concerns
-
Cons: Have to pass messages through many layers and methods.
-
-
Alternative 2: Have Model itself manage imports and exports
-
Explanation: Create methods in Model that directly handle conversion, imports, and exports.
-
Pros: Less message passing between layers
-
Cons: Worse modularity and Separation of Concerns.
-
-
Alternative 3: Use a 3rd party library to assist in managing imports/exports
-
Pros: Potentially more powerful functionality.
-
Pros: Good Separation of Concerns as the library is entirely modular.
-
Cons: Need to create methods to adapt data to be compatible with the library API.
-
Cons: Functionality is obscured. May be difficult to fix any unforseen errors.
-
3.8. Logging
We are using java.util.logging package for logging. The LogsCenter class is used to manage the logging levels and logging destinations.
-
The logging level can be controlled using the
logLevelsetting in the configuration file (See Section 3.11, “Configuration”) -
The
Loggerfor a class can be obtained usingLogsCenter.getLogger(Class)which will log messages according to the specified logging level -
Currently log messages are output through:
Consoleand to a.logfile.
Logging Levels
-
SEVERE: Critical problem detected which may possibly cause the termination of the application -
WARNING: Can continue, but with caution -
INFO: Information showing the noteworthy actions by the App -
FINE: Details that is not usually noteworthy but may be useful in debugging e.g. print the actual list instead of just its size
3.9. Autocomplete Implementation
3.9.1. Current implementation (v1.4)
The logic behind autocompletion is handled by an Autocompleter class.
On pressing <TAB>, Command Box will raise an event and check if the current text in the command box is autocompletable, that is to say, it is a prefix of one of the existing commands supported by Anakin.
If it is Autocompletable, Autocompleter will search through the list of existing commands in lexicographic order and find the first match for the current text in the command box.
3.9.2. Design considerations
-
Alternative 1 (current choice): Use a set of pre-decided completion text for each command and have a list of all supported command words
-
Explanation: Each command has a pre-decided
AUTOCOMPLETE_TEXTfield and we do prefix-matching between the text in the command box and our existing set of command words. If there is a potential match, we replace the current text in the command box with theAUTOCOMPLETE_TEXTof the supported command which it is matched to. -
Pros: Provides better modularity by decreasing the depndency of autocomplete on external components (Current Implementation)
-
Cons: Less personalisation to each user. This design doesn’t take into account the past commands that the user has issued.
-
-
Alternative 2: Match current command against the history of previously executed commands
-
Pros: Better personalisation of each command
-
Cons: Worse modularity and separation of concerns as the autocompleter would need to interact with the history. As such, it might increase coupling between the autocomplete and history components.
-
3.9.3. How to add autocompletion for new commands
-
Should there be a need to include new commands, you can follow the following steps to ensure your command can be autocompleted.
Example Scenario: Suppose we just introduced the undo command and we wish to integrate it with the autocompleter.
Step 1 : Add the AUTOCOMPLETE_TEXT field to the class. This will decide what the command autocompletes to when the user presses tab.

Step 2 : Add the class to Autocompleter java

With that, you’re good to go!
3.10. Card Scheduling implementation
3.10.1. Current implementation (v1.4)
The logic behind scheduling is handled in Card.java. Each card contains reviewScore and nextReviewDate fields which determine how well the user remembers the card and when the user should review the card again respectively.
When each card is classified using classify, it’s score is adjusted according to a modified version of the Super Memo 2 algorithm which we have detailed below. The review score is then updated, and using this review score
we calculate the number of days to add to the current review date.
3.10.2. Design considerations
-
Alternative 1 (current choice): Implement the scheduling update by attaching the scheduling process to the card class
-
Pros: As only cards are meant to be scheduled, this will increase cohesion by strengthening the relationship between cards and the scheduling process.
-
Cons: Should there be a need to implement scheduling of decks, then we will need to refactor our code for scheduling.
-
-
Alternative 2: Create a separate scheduler class to handle performance operations.
-
Pros: This will allow us to schedule multiple type of objects.
-
Cons: This will decrease cohesion of the components as we only intend for cards to be scheduled in this application.
-
3.10.3. Scheduling Algorithm details
-
The variant of the Super Memo 2 algorithm which we have implemented in this application works as follows:
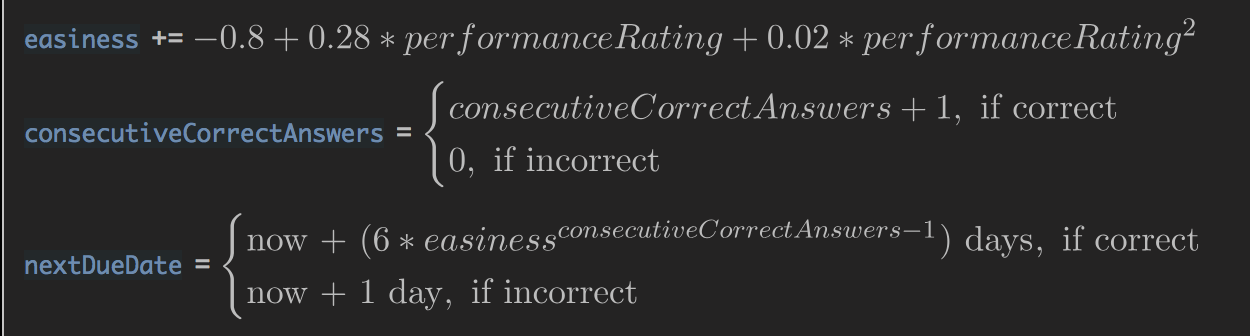
Image : A description of the Super Memo 2 variant we implemented. Formula taken from Blue Raja’s blog
Performance Rating:
How the user assesses his/her performance during classify.
easy corresponds to a 0 before scaling
normal corresponds to a 1 before scaling
hard corresponds to a 2 before scaling
Easiness Score : This corresponds to reviewScore in our implementation
As we only have three levels of difficulty, we have added a BIAS term to scale the reviewScore.
3.11. Configuration
Certain properties of the application can be controlled (e.g App name, logging level) through the configuration file (default: config.json).
4. Documentation
We use asciidoc for writing documentation.
| We chose asciidoc over Markdown because asciidoc, although a bit more complex than Markdown, provides more flexibility in formatting. |
4.1. Editing Documentation
See UsingGradle.adoc to learn how to render .adoc files locally to preview the end result of your edits.
Alternatively, you can download the AsciiDoc plugin for IntelliJ, which allows you to preview the changes you have made to your .adoc files in real-time.
4.2. Publishing Documentation
See UsingTravis.adoc to learn how to deploy GitHub Pages using Travis.
4.3. Converting Documentation to PDF format
We use Google Chrome for converting documentation to PDF format, as Chrome’s PDF engine preserves hyperlinks used in webpages.
Here are the steps to convert the project documentation files to PDF format.
-
Follow the instructions in UsingGradle.adoc to convert the AsciiDoc files in the
docs/directory to HTML format. -
Go to your generated HTML files in the
build/docsfolder, right click on them and selectOpen with→Google Chrome. -
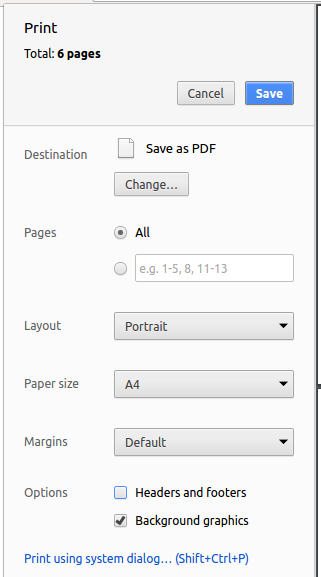
Within Chrome, click on the
Printoption in Chrome’s menu. -
Set the destination to
Save as PDF, then clickSaveto save a copy of the file in PDF format. For best results, use the settings indicated in the screenshot below.
4.4. Site-wide Documentation Settings
The build.gradle file specifies some project-specific asciidoc attributes which affects how all documentation files within this project are rendered.
Attributes left unset in the build.gradle file will use their default value, if any.
|
| Attribute name | Description | Default value |
|---|---|---|
|
The name of the website. If set, the name will be displayed near the top of the page. |
not set |
|
URL to the site’s repository on GitHub. Setting this will add a "View on GitHub" link in the navigation bar. |
not set |
|
Define this attribute if the project is an official SE-EDU project. This will render the SE-EDU navigation bar at the top of the page, and add some SE-EDU-specific navigation items. |
not set |
4.5. Per-file Documentation Settings
Each .adoc file may also specify some file-specific asciidoc attributes which affects how the file is rendered.
Asciidoctor’s built-in attributes may be specified and used as well.
Attributes left unset in .adoc files will use their default value, if any.
|
| Attribute name | Description | Default value |
|---|---|---|
|
Site section that the document belongs to.
This will cause the associated item in the navigation bar to be highlighted.
One of: * Official SE-EDU projects only |
not set |
|
Set this attribute to remove the site navigation bar. |
not set |
4.6. Site Template
The files in docs/stylesheets are the CSS stylesheets of the site.
You can modify them to change some properties of the site’s design.
The files in docs/templates controls the rendering of .adoc files into HTML5.
These template files are written in a mixture of Ruby and Slim.
|
Modifying the template files in |
5. Testing
5.1. Running Tests
There are three ways to run tests.
| The most reliable way to run tests is the 3rd one. The first two methods might fail some GUI tests due to platform/resolution-specific idiosyncrasies. |
Method 1: Using IntelliJ JUnit test runner
-
To run all tests, right-click on the
src/test/javafolder and chooseRun 'All Tests' -
To run a subset of tests, you can right-click on a test package, test class, or a test and choose
Run 'ABC'
Method 2: Using Gradle
-
Open a console and run the command
gradlew clean allTests(Mac/Linux:./gradlew clean allTests)
| See UsingGradle.adoc for more info on how to run tests using Gradle. |
Method 3: Using Gradle (headless)
Thanks to the TestFX library we use, our GUI tests can be run in the headless mode. In the headless mode, GUI tests do not show up on the screen. That means the developer can do other things on the Computer while the tests are running.
To run tests in headless mode, open a console and run the command gradlew clean headless allTests (Mac/Linux: ./gradlew clean headless allTests)
5.2. Types of tests
We have two types of tests:
-
GUI Tests - These are tests involving the GUI. They include,
-
System Tests that test the entire App by simulating user actions on the GUI. These are in the
systemtestspackage. -
Unit tests that test the individual components. These are in
seedu.address.uipackage.
-
-
Non-GUI Tests - These are tests not involving the GUI. They include,
-
Unit tests targeting the lowest level methods/classes.
e.g.seedu.address.commons.StringUtilTest -
Integration tests that are checking the integration of multiple code units (those code units are assumed to be working).
e.g.seedu.address.storage.StorageManagerTest -
Hybrids of unit and integration tests. These test are checking multiple code units as well as how the are connected together.
e.g.seedu.address.logic.LogicManagerTest
-
5.3. Troubleshooting Testing
Problem: HelpWindowTest fails with a NullPointerException.
-
Reason: One of its dependencies,
HelpWindow.htmlinsrc/main/resources/docsis missing. -
Solution: Execute Gradle task
processResources.
6. Dev Ops
6.1. Build Automation
See UsingGradle.adoc to learn how to use Gradle for build automation.
6.2. Continuous Integration
We use Travis CI and AppVeyor to perform Continuous Integration on our projects. See UsingTravis.adoc and UsingAppVeyor.adoc for more details.
6.3. Coverage Reporting
We use Coveralls to track the code coverage of our projects. See UsingCoveralls.adoc for more details.
6.4. Documentation Previews
When a pull request has changes to asciidoc files, you can use Netlify to see a preview of how the HTML version of those asciidoc files will look like when the pull request is merged. See UsingNetlify.adoc for more details.
6.5. Making a Release
Here are the steps to create a new release.
-
Update the version number in
MainApp.java. -
Generate a JAR file using Gradle.
-
Tag the repo with the version number. e.g.
v0.1 -
Create a new release using GitHub and upload the JAR file you created.
6.6. Managing Dependencies
A project often depends on third-party libraries. For example, Address Book depends on the Jackson library for XML parsing. Managing these dependencies can be automated using Gradle. For example, Gradle can download the dependencies automatically, which is better than these alternatives.
a. Include those libraries in the repo (this bloats the repo size)
b. Require developers to download those libraries manually (this creates extra work for developers)
Appendix A: Product Scope
Target user profile:
User: Student who uses flashcards heavily in their studies but finds trouble managing too many physical cards.
-
has a need to manage a significant number of flashcards
-
prefers desktop over other media (i.e. mobile)
-
can type quickly
-
prefers typing over mouse input
-
is reasonably comfortable using CLI apps
Value proposition: Manage flashcards faster than a typical mouse/GUI driven app.
Without any UI elements, the UI is extremely clean. Users will never accidentally click on something wrongly as there is never any functional response to mouse input.
Appendix B: User Stories
Priorities: High (must have) - * * *, Medium (nice to have) - * *, Low (unlikely to have) - *
| Priority | As a … | I want to … | So that I can… |
|---|---|---|---|
|
new user |
see usage instructions |
refer to instructions when I forget how to use the App |
|
user |
add a new deck |
|
|
user |
add cards to a deck |
|
|
user |
delete a card |
remove flashcards that I no longer need |
|
user |
find a deck by name |
locate a deck without having to go through the entire list |
|
user |
iterate through decks |
iterate viewing a deck of flashcards |
|
user with many flashcards |
filter flashcards by tag |
locate a flashcard easily |
|
user |
rate my flashcards |
identify weak areas for later revision |
|
user with multiple devices |
import/ export decks to/ from external files |
manage Anakin decks and cards across devices |
|
user that types quickly |
custom keyboard shortcuts |
bind commands to my own aliases |
Appendix C: Use Cases
(For all use cases below, the System is Anakin and the Actor is the user, unless specified otherwise)
C.1. List decks
MSS
-
User requests to list decks
-
Anakin shows a list of decks
Use case ends.
Extensions
-
2a. The list is empty.
Use case ends.
C.2. Create a deck
MSS
-
User requests to create deck
-
Anakin prompts for deck details
-
User enters deck details
-
Anakin creates the deck
Use case ends.
Extensions
-
3a. User enters name of existing deck
-
3a1. Anakin displays an error message.
-
3a2. Anakin prompts for deck details.
Use case resumes at step 4.
-
C.3. Delete a deck
MSS
-
User requests to list decks
-
Anakin shows a list of decks
-
User requests to delete a specific deck in the list
-
Anakin deletes the deck
Use case ends.
Extensions
-
2a. The list is empty.
Use case ends.
-
3a. The given index is invalid.
-
3a1. Anakin displays an error message.
Use case resumes at step 2.
-
C.4. Add a card to a deck
MSS
-
User selects a deck
-
Anakin displays deck details
-
User requests to add flashcard to the current deck
-
Anakin prompts for flashcard details
-
User enters requested details
-
Anakin adds flashcard to the current deck
Use case ends.
Extensions
-
2a. The list is empty.
Use case ends.
-
4a. User enters details in the wrong format
-
4a1. Anakin displays error message
-
4a2. Anakin prompts for flashcard details
-
4a3. If details are in the wrong format, repeat steps 1-2
Use case ends
-
C.5. Delete a card from a deck
MSS
-
User selects a deck
-
Anakin displays deck details
-
User requests to delete a card.
-
Anakin deletes the specified from the current deck
Use case ends.
Extensions
-
3a. The deck is empty.
-
3a1. Anakin displays error message.
Use case ends.
-
3a. The index specified for the card does not exist.
-
3a1. Anakin displays error message
Use case resumes at step 3.
-
C.6. Locate a deck
MSS
-
User requests to display any decks that match their search query.
-
Anakin returns the list of decks that match the search query.
Use case ends.
Extensions
-
1a. The deck does not exist
-
1a1. Anakin returns an empty list of decks
Use case ends.
-
C.7. Locate a card
MSS
-
User requests to display any cards that match their search query.
-
Anakin returns the list of cards that match the search query.
Use case ends.
Extensions
-
1a. The card does not exist
-
1a1. Anakin returns an empty list of cards
Use case ends.
-
C.8. Export a deck
MSS
-
User requests to export a deck
-
Anakin exports the deck to the same directory as the Anakin.jar file.
Use case ends.
Extensions
-
1a. The deck does not exist at the index specified
-
1a1. Anakin displays error message
Use case ends.
-
C.9. Import a deck
MSS
-
User requests to import a deck at a specified file location
-
Anakin imports the deck
Use case ends.
Extensions
-
1a. The file does not exist at the location specified
-
1a1. Anakin displays error message
Use case ends.
-
-
1a. The file exists but has the wrong format
-
1a1. Anakin displays error message
Use case ends.
-
Appendix D: Instructions for Manual Testing
Given below are instructions to test Anakin manually. These instructions only provide a starting framework for testers; testers are expected to do additional, exploratory testing.
D.1. Launch
Initial launch
-
Download the jar file and copy into an empty folder
-
Double-click the jar file to launch Anakin Expected: Shows the GUI with a set of sample decks.
D.2. Navigating into a deck
Prerequisites: There must be at least 1 deck in the application.
-
cd INDEX_OF_DECKwhereINDEX_OF_DECKis the currently displayed index of the target deck. -
The card panel on the right of the deck panel should be populated with a list of the cards in the target deck. If the deck is empty, no cards will be shown.
D.3. Exporting a deck
Exporting a deck from Anakin to a .xml file.
Prerequisites: There must be at least 1 deck in the application.
-
Enter the command
export INDEX_OF_DECKwhereINDEX_OF_DECKis the currently displayed index of the target deck. -
Check the directory that contains Anakin.jar. There should be a
.xmlfile with the same name as the target deck.
D.4. Importing a deck
Importing a deck from a .xml file at a known file location
Prerequisites: Target deck must not already exist in Anakin. Renaming an existing deck is acceptable.
-
Enter the command
import DECK_FILEPATHwhereDECK_FILEPATHis the relative filepath of the deck from the folder that Anakin.jar is in. -
Anakin should display an import success message and the deck should appear in the deck panel.
-
Navigating into the deck should display all the cards of that deck. (Assuming the deck was not empty)
-
Performing the same operation again should display an error that states "This deck already exist in Anakin"
Importing a file that is in the same folder as Anakin.jar Prerequisites: Target must be in the same folder as Anakin.jar. Target deck must not already exist in Anakin. Renaming an existing deck is acceptable.
-
Enter the command
import DECK_NAMEwhereDECK_NAMEis the name of the.xmlfile. -
Anakin should display an import success message and the deck should appear in the deck panel.
-
Navigating into the deck should display all the cards of that deck. (Assuming the deck was not empty)
-
Performing the same operation again should display an error that states "This deck already exist in Anakin"
Importing from an invalid location
-
Enter
import BAD_FILEPATHwhereBAD_FILEPATHis a non-existent location. -
Anakin should display an error stating "File at
BAD_FILEPATHcould not be found".
Importing an invalid file
-
Enter the command
import DECK_FILEPATHwhereDECK_FILEPATHis the relative filepath of a corrupted or invalid from the folder that Anakin.jar is in. -
Anakin should display an error stating "Target deck contains invalid data".
Appendix E: Non Functional Requirements
-
Should work on any mainstream OS as long as it has Java
9or higher installed. -
Should be usable on a laptop with average hardware
-
Internal state should be persistent
-
Internal state should be recoverable from system crashes
-
Should be able to hold up to 1000 flashcards without a noticeable sluggishness in performance for typical usage.
-
A user with above average typing speed for regular English text (i.e. not code, not system admin commands) should be able to accomplish most of the tasks faster using commands than using the mouse.
-
Interactions should be smooth (<2 seconds response time)
-
Should be usable by a command-line novice
-
Navigation should be fast for expert user
-
Internal state should be modifiable by expert user
-
Internal state should be exportable and importable
-
Should support formatting languages (e.g. Markdown, LaTEX)
Appendix F: Glossary
- Deck
-
A collection of flashcards.
- Flashcard
-
A card containing a prompt on one side, and a small amount of information (the answer) on the other
- Internal State
-
The data of the application which includes decks, cards, and the order they are in but excludes session based information like Command History.
Maintained by Model and stored in Storage. - Markdown
-
A markup language with plain text formatting syntax.
- Mainstream OS
-
Windows, Linux, Unix, OS-X